Showing posts with label Android. Show all posts

Sunday, August 24, 2014

Nice blog on Android development

Found this nice blog in Android weekly newsletter

ptrprograms.blogspot.com.es

Friday, August 22, 2014

Android runtime aka ART

Recentaly Android L had been in news a lot. There are many posts on net which describes the features coming in. The one which I like the most is android runtime or ART. Originally android uses dalvik runtime which converts the instructions at the time of running the app which had been a major reason of android being slow. In ART app code gets converted into executable ones and for ever. After that there is no conversion of code while running the app. This results in approximately 30% faster execution, hence a fast device and memory saving too. What few people know is that this feature is present in current kitkat version also. Only that its not the default setting. Goto settings, developer options, default runtime; and select ART and reboot the device.

It will take a while in upgrading apps. After that you will notice a faster device. Please keep in mind that at present some apps might not work properly. If that's a major issue you will need to revert back to dalvik runtime. At present I only had issue with one app which I can live with. Please also note that if you are not running kitkat you may have more issues or won't have the option of ART which depends on the version of Android you are running.

PS:
a nice intro of ART

http://www.anandtech.com/show/8231/a-closer-look-at-android-runtime-art-in-android-l

Wednesday, August 20, 2014

Best e-reader on Android

Look no further, moon+ reader pro is the best. What's more is that currently you can get it for 50 percent off. So if you are looking for reader for your pdf and epub files grab it from Google play store.

Sunday, August 17, 2014

Android development with Java

Here is a nice introduction of how to develop android apps using Java

Please copy paste the link given below.

www.linuxuser.co.uk/tutorials/android-development-with-java

Saturday, August 16, 2014

Keyboards on Android

Hi All

I am currently being able to write this post using keyboard that comes with Keepass2Android, which is smallest still typable keyboard on android. Other keyboards take up too much space.


Friday, August 15, 2014

C, C++, Java programming on Android

Hello folks, recently I've been trying to do some programming on my tablet galaxy tab 2. For that I installed couple of apps whose list I am presenting here for those who are looking to learn programming on tablet.

1. AIDE
For android and Java programming look no further. You can also pay to get guided tutorials. Excellent app, free for expert coding.

2. CPPDROID
For C, C++ programming on your tablet. Excellent source editor; write, save, compile. Its as easy as one two three. Unfortunately it's better to pay and get rid of ads to reclaim screen estate. Along with that I use terminalide keyboard which itself is great app for programming but lacks smoothness of CPPDROID. This app also has nice tutorials and examples.

Other app worth mentioning are SAND ide, DroidEdit and SourceReader. Please look for them on Google play. Hope this helps. Thanks for stopping by n reading.

Wednesday, October 30, 2013

Clear data in your Android device before going for reinstall

Hi,

I used to have this phenomenon that I reinstall line after I take a backup change ROM and restore. Line always used to misbehave after restore and I used to reinstall it. Later I learned that a cleanup of data in settings is almost as good as reinstall and it saves time if app is a huge one.

Try it out next time if any of your app misbehave.

Thanks

Monday, March 4, 2013

What's new in Intelij IDEA 12

Recently when I checked update for Intellij IDEA I found that new version of ide has been released. Check the link below to see new features:

http://www.jetbrains.com/idea/whatsnew/

What I noticed is that Android support has been improved. With update to Android 4.2, IDEA 11 was no longer working with SDK, which is working now.

Saturday, November 24, 2012

Calling system applications in Android

In my previous posts I have used reading contacts through API calls, however there is an easy method for doing standard tasks by calling system's pre installed apps. In this post I am going to cover the details of how we can call the system apps through intents.


We are going to create a spinner control for providing the user some options and hit a submit button.

Here's main.xml which defines the UI.

 <?xml version="1.0" encoding="utf-8"?>  
 <LinearLayout xmlns:android="http://schemas.android.com/apk/res/android"  
        android:orientation="vertical"  
        android:layout_width="fill_parent"  
        android:layout_height="fill_parent"  
     >  
   <Spinner  
       android:id="@+id/spinner1"  
       android:layout_width="match_parent"  
       android:layout_height="wrap_content"  
       android:entries="@array/application_array"  
       android:prompt="@string/app_prompt" />  
   <Button  
       android:id="@+id/btnSubmit"  
       android:layout_width="wrap_content"  
       android:layout_height="wrap_content"  
       android:text="Submit"  
       android:onClick="btnSubmitOnClick"/>  
 </LinearLayout>  


Spinner control requires a string array (application_array) for it's entries which is defined in strings.xml.

 <?xml version="1.0" encoding="utf-8"?>  
 <resources>  
   <string name="app_name">callingsystemapps</string>  
   <string name="app_prompt">Choose a application</string>  
   <string-array name="application_array">  
     <item>Browser</item>  
     <item>Dialler</item>  
     <item>Map</item>  
     <item>Contacts</item>  
   </string-array>  
 </resources>  


In main.xml we have also have defined onClick method btnSubmitOnClick which is defined in MyActivity.java

   public void btnSubmitOnClick (View v)  
   {  
     Spinner spinner1 = (Spinner) findViewById(R.id.spinner1);  
     if (spinner1.getSelectedItem().toString().equals("Browser")){  
       Intent i = new  
           Intent(android.content.Intent.ACTION_VIEW,  
           Uri.parse("http://www.google.com"));  
       startActivity(i);  
     }  
     else if (spinner1.getSelectedItem().toString().equals("Dialler")){  
       Intent i = new  
           Intent(android.content.Intent.ACTION_DIAL);  
       startActivity(i);  
     }  
     else if (spinner1.getSelectedItem().toString().equals("Map")) {  
         Intent i = new  
             Intent(android.content.Intent.ACTION_VIEW,  
             Uri.parse("geo:37.827500,-122.481670"));  
         startActivity(i);  
     }  
     else if (spinner1.getSelectedItem().toString().equals("Contacts")) {  
       Intent i = new  
           Intent(android.content.Intent.ACTION_PICK);  
       i.setType(ContactsContract.CommonDataKinds.Phone.CONTENT_TYPE);  
       startActivity(i);  
     }  


Only difference between the four is the passing intent which is as below:

ACTION_VIEW
ACTION_DIAL
ACTION_PICK


Along with that we are passing parameters depending upon intent type. After that it's just calling startActivity on the intent.

Try running the example and you shall get like this.


Thanks for reading, don't forget to check links page for resources.

Wednesday, November 21, 2012

getActionBar and targetSdkVersion in Android development

Hi All,

Recently I was trying to reiterate Android docs training just to fill in anything I missed previously. There I came across this piece of code:

     // Initialize member TextView so we can manipulate it later  
     mTextView = (TextView) findViewById(R.id.edit_message);  
     // Make sure we're running on Honeycomb or higher to use ActionBar APIs  
     if (Build.VERSION.SDK_INT >= Build.VERSION_CODES.HONEYCOMB) {  
       // For the main activity, make sure the app icon in the action bar  
       // does not behave as a button  
       ActionBar actionBar = getActionBar();  
       actionBar.setHomeButtonEnabled(false);  
     }  


I tried to put that in a simple hello world example and it worked on an 2.2 emulator, however it failed to run on 4.0 emulator. On debugging it turned out that getActionBar was returning null value. Though there was on-line help available for some other directions it just came to my mind to check AndroidManifest.xml file. There I saw only "android:minSdkVersion="8"" I remembered that there was a target SDK  as well which can be defined. So I checked a project created by eclipse and found the "android:targetSdkVersion="15"" line and added it to "uses-sdk " tag in AndroidManifest.xml and the app started working on 4.0 emulator.

This clears two things, first is that Idea IDE adds only minSDKVersion while eclipse adds targetSDKVersion as well. Which is reflected in new project also but could effect like this.

Second, if you search for getActionBar returning null you get loads of advice but maybe not this. So check if you are having this issue.

Thanks for reading. Thanks for Android guys for creating such a good documentation, which by and large so much better than Facebook developer docs. Only wish Facebook docs were also as clear as the Android docs.

Sunday, November 18, 2012

Nexus 4 unboxing and first impressions

Google’s newest flagship handset, the LG Nexus, 4 is finally upon us. The highly anticipated stock Android smartphone features some of the highest-end specs of any phone currently on the market, but does it manage to satisfy? Stay tuned for a complete review. However, in the meantime, be sure to catch our unboxing and first impressions below.

http://supertechblog.com/2012/11/17/nexus-4-unboxing-and-first-impressions/

Thursday, October 25, 2012

Accessing contacts and sending SMS in an Android app

Re-posting : An outrageously simple note taking android app made further better (part 5)


In this post we will cover sending SMS through Android App and also how to read contacts.

I apologize for the gap in coming up with this post. I can only work as much as my health permits, which sometimes not very long. :)

The very first thing an Android app needs is to register for permission to send SMS and read contacts. This can be done by putting these lines into AndroidManifest.xml.


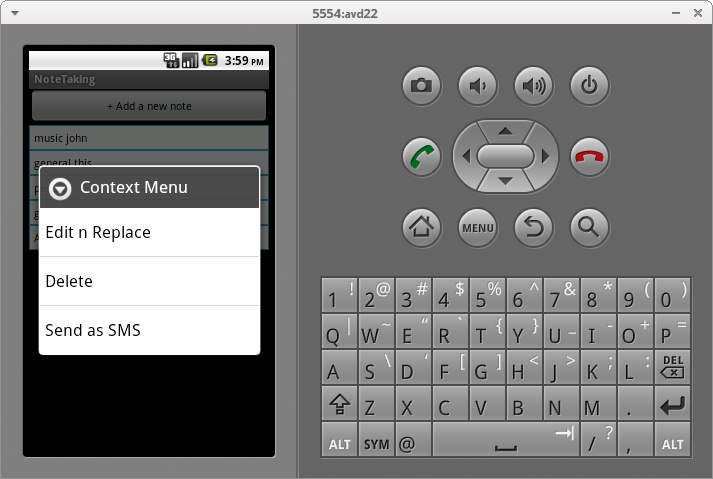
We will add a new menu item in context menu like below.

    public void onCreateContextMenu(ContextMenu menu, View v,ContextMenu.ContextMenuInfo menuInfo) {
        super.onCreateContextMenu(menu, v, menuInfo);
        currentNote = ((TextView)v).getText().toString();
        // Create your context menu here
        menu.setHeaderTitle("Context Menu");
        menu.add(0, v.getId(), 0, "Edit n Replace");
        menu.add(0, v.getId(), 1, "Delete");
        menu.add(0, v.getId(), 2, "Send as SMS");
    }

And we will see somethinglike below.


For handling this menu item we will add a new else section.

    public boolean onContextItemSelected(MenuItem item) {
        // Call your function to preform for buttons pressed in a context menu
        // can use item.getTitle() or similar to find out button pressed
        // item.getItemID() will return the v.getID() that we passed before
        super.onContextItemSelected(item);

        if ( item.getTitle().toString().equals("Delete")){
            NotesDatabase db =new NotesDatabase(this);

            db.searchAndDelete(currentNote);
            onResume();
        }
        else if ( item.getTitle().toString().equals("Edit n Replace")) {
            Intent intent = new Intent(this, EditNoteActivity.class);
            intent.putExtra("ACTION","oldnote");
            intent.putExtra("ACTION2","replace");
            intent.putExtra(EXTRA_MESSAGE,currentNote);
            startActivity(intent);
        }
        else if (item.getTitle().toString().equals("Send as SMS")){
            Intent intent = new Intent(this, SendAsSmsActivity.class);
            intent.putExtra("SMS", currentNote);
            startActivity(intent);
        }


        return true;
    }

In the newly added code we are creating a new Activity SendAsSmsActivity and passing the note as SMS in intent.

Here is SendAsSmsActivity.xml which is defined as below.


              android:layout_width="fill_parent"
              android:layout_height="fill_parent"
              android:orientation="vertical">
            android:id="@+id/editText1"
        android:layout_width="match_parent"
        android:layout_height="wrap_content"
        android:ems="10"
        android:inputType="number"
        android:hint="Enter number here..."
        android:gravity="top|left">
       
   
                android:id="@+id/editText2"
            android:layout_width="match_parent"
            android:layout_height="1dp"
            android:layout_weight="1"
            android:ems="10"
            android:inputType="text"
            android:hint="Enter note here..."
            android:gravity="top|left" >


                      android:layout_width="match_parent"
                  android:layout_height="wrap_content"
                  android:orientation="horizontal"
                  android:weightSum="2">
       
                 android:id="@+id/buttonSendSMS"

                android:layout_weight="1"
                android:layout_width="0dp"
                android:layout_height="wrap_content"
                android:onClick="onClickSend"

                android:text="Send" />
                        android:id="@+id/button2"
                android:layout_weight="1"
                android:layout_width="0dp"
                android:layout_height="wrap_content"
                android:onClick="onClickCancel"

                android:text="Cancel" />
 

It will come up like this


Here we are using nested LinearLayout with nested wights assigned to buttons as well as second edit text, which though is not a good practise; but for our small app workes fine.

Below is SendAsSmsActivity.java

public class SendAsSmsActivity extends Activity {
    String sms = new String();

    public void onCreate(Bundle savedInstanceState) {
        super.onCreate(savedInstanceState);
        setContentView(R.layout.sendassmsactivity);
        Intent intent = getIntent();
        EditText text = (EditText) findViewById(R.id.editText2);
        Bundle extras = intent.getExtras();
        sms = extras.getString("SMS");
        text.setText(sms);
        EditText text1 = (EditText) findViewById(R.id.editText1);
        registerForContextMenu (text1);
    }
    public void onClickSend ( View button){
        String SENT = "SMS_SENT";
        String DELIVERED = "SMS_DELIVERED";

        PendingIntent sentPI = PendingIntent.getBroadcast(this,0,new Intent(SENT),0);
        PendingIntent deliveredPI = PendingIntent.getBroadcast(this,0,new Intent(DELIVERED),0);

        //---when the SMS has been sent---
        registerReceiver(new BroadcastReceiver(){
            @Override
            public void onReceive(Context arg0, Intent arg1) {
                switch (getResultCode())
                {
                    case Activity.RESULT_OK:
                        Toast.makeText(getBaseContext(), "SMS sent",
                                Toast.LENGTH_SHORT).show();
                        break;
                    case SmsManager.RESULT_ERROR_GENERIC_FAILURE:
                        Toast.makeText(getBaseContext(), "Generic failure",
                                Toast.LENGTH_SHORT).show();
                        break;
                    case SmsManager.RESULT_ERROR_NO_SERVICE:
                        Toast.makeText(getBaseContext(), "No service",
                                Toast.LENGTH_SHORT).show();
                        break;
                    case SmsManager.RESULT_ERROR_NULL_PDU:
                        Toast.makeText(getBaseContext(), "Null PDU",
                                Toast.LENGTH_SHORT).show();
                        break;
                    case SmsManager.RESULT_ERROR_RADIO_OFF:
                        Toast.makeText(getBaseContext(), "Radio off",
                                Toast.LENGTH_SHORT).show();
                        break;
                }
            }
        }, new IntentFilter(SENT));

        //---when the SMS has been delivered---
        registerReceiver(new BroadcastReceiver(){
            @Override
            public void onReceive(Context arg0, Intent arg1) {
                switch (getResultCode())
                {
                    case Activity.RESULT_OK:
                        Toast.makeText(getBaseContext(), "SMS delivered",
                                Toast.LENGTH_SHORT).show();
                        break;
                    case Activity.RESULT_CANCELED:
                        Toast.makeText(getBaseContext(), "SMS not delivered",
                                Toast.LENGTH_SHORT).show();
                        break;
                }
            }
        }, new IntentFilter(DELIVERED));

        SmsManager smsManager = SmsManager.getDefault();

        EditText text1 = (EditText) findViewById(R.id.editText1);
        Log.v("phoneNumber", text1.getText().toString());
        Log.v("MEssage",sms);
        smsManager.sendTextMessage(text1.getText().toString(), null, sms, sentPI, deliveredPI);
        finish();
    }
    public void onClickCancel( View button){
        finish();
    }
    public void onCreateContextMenu(ContextMenu menu, View v,ContextMenu.ContextMenuInfo menuInfo) {
        super.onCreateContextMenu(menu, v, menuInfo);
        //currentNote = ((TextView)v).getText().toString();
        // Create your context menu here
        // Clear current contents
        menu.clearHeader();
        menu.clear();

        menu.setHeaderTitle("Context Menu");
        menu.add(0, v.getId(), 0, "Contacts");
    }
    public boolean onContextItemSelected(MenuItem item) {
        // Call your function to preform for buttons pressed in a context menu
        // can use item.getTitle() or similar to find out button pressed
        // item.getItemID() will return the v.getID() that we passed before
        super.onContextItemSelected(item);

        if ( item.getTitle().toString().equals("Contacts")){
            Intent intent = new Intent(this,readAllActivity.class);
            startActivityForResult( intent, 0);
        }
        return true;
    }

}


Kindly go through my previous post if you are not familier with above code.

We are here in onCreate method; setting the view by setContentView, getting the intent by getIntent, getting the note by getExtras and getString and assigning to second edit text. We are also registering the first edit text for a context menu.

onClickSend is the method registered for "Send" button. Here is the actual code for sending SMS  Here we are creating PendingIntent which are a kind of callback mechanism in which we specifies the action need to be performed at a certain event later in lifecycle of application.

registerReceiver defines the method which needs to be performed in the case of event (SMS sent). It has two parameters one is BroadcastReceiver which actually holds the methods needs to be performed. When the onReceive overridden method is called it raises a Toast ( small info window) based on  the return value of getResultCode which tells whether the action was prformed well.

Second parameter is a IntentFilter object.

Here's the toast :)


After that SmsManager.getDefault returns a sms manager object, which actually send the sms and also registers the PendingIntents.

Overriding onCreateContextMenu definesthe context menu which we have registered for text1 in onCreate. "Contacts" is the only menu item here.


In onContextItemSelected when we find this selected we start a new activity readAllActivity.

Here is readAllActivity.java

public class readAllActivity extends Activity {


    public void onCreate(Bundle savedInstanceState) {
        super.onCreate(savedInstanceState);
        setContentView(R.layout.main);
        readContacts();
    }
    public void readContacts (){
        LinearLayout lLayout = (LinearLayout)findViewById(R.id.layout1);
        final LayoutInflater inflater = (LayoutInflater)getSystemService(Context.LAYOUT_INFLATER_SERVICE);

        Cursor cursor = getContentResolver().query(ContactsContract.Contacts.CONTENT_URI,null, null, null, null);
        while (cursor.moveToNext()) {
            String contactId = cursor.getString(cursor.getColumnIndex(
                    ContactsContract.Contacts._ID));
                Cursor phones = getContentResolver().query( ContactsContract.CommonDataKinds.Phone.CONTENT_URI, null, ContactsContract.CommonDataKinds.Phone.CONTACT_ID +" = "+ contactId, null, null);
                while (phones.moveToNext()) {
                    String name = phones.getString(phones.getColumnIndex( ContactsContract.CommonDataKinds.Phone.DISPLAY_NAME));
                    TextView b2 = (TextView) inflater.inflate(R.layout.textviews,null);
                    b2.setTextColor(Color.BLACK) ;
                    b2.setText(name);
                    registerForContextMenu(b2);
                    lLayout.addView(b2);

                    String phoneNumber = phones.getString(phones.getColumnIndex( ContactsContract.CommonDataKinds.Phone.NUMBER));
                    TextView b = (TextView) inflater.inflate(R.layout.textviews,null);
                    b.setTextColor(Color.BLACK) ;
                    b.setText(phoneNumber);
                    registerForContextMenu(b);
                    lLayout.addView(b);

                }
                phones.close();
        }
        cursor.close();
    }
}

getContentResolve returns all the contacts in a cursor "phones", which we scrolls through and populates edit texts.

Till now all is fine except how do we return the selected phone number.

We have used startActivityForResult instead of startActivity in onContextItemSelected of SendAsSmsActivity.java file.

In readAllActivity.java we will add this method to set returning data

     public void onClickTextView1(View v) {
        Intent resultData = new Intent();
        String s =((TextView)v).getText().toString();
        resultData.putExtra("number", s);
        setResult(Activity.RESULT_OK, resultData);
        finish();
    }
Aaaaand we shall have our number in first EditText.

Thanks to Wei-Meng Lee for his "Beginning Android Application Development" for sms code and stackoverflow.com for rest of help.

Sunday, October 7, 2012

Saturday, October 6, 2012

An outrageously simple note taking android app (part 1)

Hi all, in this post we will create a very basic note taking app. It will store only single note and retrieve it back. In later post we will keep extending it until it become a fully working app. So bear with it as the attempt  is to learn android programming not anything else.

Instructions here are being done with IntelliJ IDEA IDE.But they shall be convertible for any IDE,or command line.

First off course create a blank project.


This newly created project already has one activity MyActivity Consider this as window in a desktop app as this has also got screen area and can have button, text, etc.

Activities in android are usually tied with an XML file where the UI is designed, in this case main.xml. Open it to design the first Activity(window) of this app.


Change the XML to remove the TextView and have a button instead.


<Button
            android:layout_width="fill_parent"
            android:layout_height="wrap_content"
            android:text="@string/AddNote"
            android:onClick="addNote"/>


This button property width as "fill_parent" which will specify that it spans the whole width of Activity, height as "wrap_content" which specify that its height will only be accommodate its label. text property sets the label of the button, which is string to be defined in strings.xml under "values" as following.

<string name="AddNote">+ Add a new note</string>

onClick defines the function which will be called when the button is pressed and wiil be defined in "MyActivity.java" file.

At this point of time UI will look like this in IntelliJ IDEA.


Here you can experiment with different device and android profiles to preview how well it will look like.

The onClick function addNote will be defined as this.


public void addNote ( View theButton) {
        Intent intent = new Intent(this, EditNoteActivity.class);
        startActivity(intent);
    }

This function does only two things, first create an intent which is like a message passing to the new Activity(window) and start new Activity EditeNoteActivity which we will shortly define.


Now create a new activity EditNoteActivity by right clicking on src--com.example -> New -> Android Component


Now we need to create a resource xml file, right click on layout directory in project view and select New->Layout resource file.


This is an empty layout file we need an edit text here, and a hew buttons. So here they are, first EditText.


<EditText
            android:id="@+id/editText1"
            android:layout_width="match_parent"
            android:layout_height="0dp"
            android:layout_weight="1"
            android:ems="10"
            android:inputType="text"
            android:hint="Enter note here..."
            android:gravity="top|left" >

        <requestFocus />
    </EditText

id uniquely identifies the field in your java code. setting the height to 0dp and weight set the field to take up screen space to its fullest. inputType specifies the default type of input like text, number etc. hint specifies the subtle non editable text to be displayed in EditText which will disappear when the user enters text. Rest of the fields can be looked up in API reference of Google site.

Set the orientation of layout to be vertical
android:orientation="vertical"

Here we have chosen LinearLayout which is more feasible for this app. There are different types of layout which can be seen on Google reference.

Now create two buttons as below


<LinearLayout xmlns:android="http://schemas.android.com/apk/res/android"
    android:layout_width="match_parent"
    android:layout_height="wrap_content"
    android:orientation="horizontal"
    android:weightSum="2">
    <Button
            android:id="@+id/button1"
            android:layout_weight="1"
            android:layout_width="0dp"
            android:layout_height="wrap_content"
            android:onClick="onClickSave"

            android:text="Save" />
    <Button
            android:id="@+id/button1"
            android:layout_weight="1"
            android:layout_width="0dp"
            android:layout_height="wrap_content"
            android:onClick="onClickBack"

            android:text="Back" />
    </LinearLayout>

Here the orientation of layout is horizontal so that buttons are sideways aligned. weightSum is 2 so that buttons are equally spaced in all type of screens. Rest of the fields are self explanatory I guess by now.

At this point the whole xml file is like this

http://snipt.org/vWP3


Now open your EditNoteActivity.java file and add onclickSave method to look like this


    public void onClickSave(View theButton) {
        String FILENAME = "note_file";

        EditText text = (EditText) findViewById(R.id.editText1);


        FileOutputStream fos = null;
        try {
            fos = openFileOutput(FILENAME, Context.MODE_PRIVATE);
        } catch (FileNotFoundException e) {
            e.printStackTrace();  //To change body of catch statement use File | Settings | File Templates.
        }
        assert fos != null;
        try {
            String str = new String (text.getText().toString());
            fos.write(str.getBytes());
            fos.close();
        } catch (IOException e) {
            e.printStackTrace();  //To change body of catch statement use File | Settings | File Templates.
        }
        finish();
    }

Here you get the handle of the button1by findViewById and passing the resourse ID. openFileOutput opens up the file on internal memory exclusively for this app as specified by MODE_PRIVATE. You take the text out of the field by getText and convert it to bytes by getBytes method before saving it to file and close it.


Now make your onCreate method to look like this


public void onCreate(Bundle savedInstanceState) {
        String FILENAME = "note_file";
        byte[] buffer = new byte[100];

        super.onCreate(savedInstanceState);
        setContentView(R.layout.editnote);
        EditText text = (EditText) findViewById(R.id.editText1);

        FileInputStream fos = null;
        try {
            fos = openFileInput(FILENAME);
        } catch (FileNotFoundException e) {
            e.printStackTrace();  //To change body of catch statement use File | Settings | File Templates.
        }
        if ( fos != null){
        try {
            fos.read(buffer, 0, 10);
            String str = new String(buffer, "UTF8");
            text.setText(str);
            fos.close();
        } catch (IOException e) {
            e.printStackTrace();  //To change body of catch statement use File | Settings | File Templates.
        }
        }
    }

This one is self explanatory mostly as it open the file and read the node. Only one worth mentioning is setContentView which takes the editnote.xml defined and create the UI. Remember it to put first before findViewById to avoid crash as this needs to be done first.

Also add onClickBack method


    public void onClickBack(View theButton) {
        finish();
    }
This one only calls finish which returns to the main Activity MyActivity.


Now build and compile and run it on emulator to see how it goes. This is fairly shortcoming app as it saves only one note and retrieves it back, however I am sure this helps in understanding many concepts in android. Especially as if you try this and the go around the reference or books you will find yourself eased out a bit.

Hope this helps and many thanks to guys on http://stackoverflow.com for helping.


Wednesday, October 3, 2012

Android development using IntelliJ part 1

Open source is about choice, they say. So here is one more choice, use IntelliJ IDE for development of android apps.

IntelliJ is a good IDE for Java development by JetBRAINS. It comes in two flavours, free community edition and  paid ultimate edition. Both can be downloaded from here.

I am using free community edition for this tutorial. Which according to site has "Powerful environment for building Google Android apps". Though I will left that for readers to decide.

Update: To install android sdk tools please refer this post.

Installation is pretty straightforward, just unzip it in a convenient location and run idea.sh file from "bin" directory. Select File -> New Project and you shall be welcomed by this dialog box


Click next and you will get this screen


Enter project name, select type as "Android Module", and click next to get following screen.


Click next with settings remains intact.


In above screen select the emulator device, one thing which surprised me was that there was no option to select build target. I manually changed that to Android API level 8 ( Android 2.2) in AndrodManifest.xml (android:minSdkVersion="8").


Just click on run and you will have your app running in emulator.


Update 2: One difference I noticed between eclipse and IntelliJ is that running app from eclipse twice runs a new instance of emulator, while IntelliJ does the , well intelligent thing to connect to the already running emulator and initiate the app within. Probably those who are well versed with eclipse will be able to tell the peculiar behavior of eclipse.


Comparing to my previous jEdit tutorial, this was short and easy. Well that's what a IDE is supposed to be, but in my personal opinion one know about the internal working more if one uses a simple editor and command line. However if you are short of time, using IDE will save you lots of time.


In forthcoming parts I will try to give examples of creating android apps step by step. Consider this a group study rather than a conventional classroom teaching as I myself is learning android programming.

All suggestions of improvement are welcome. Thanks for reading.

Monday, October 1, 2012

Android development using jEdit part 2

In this part of tutorial we will see how to create Android virtual devices, create a project and deploy it.

First of all create an AVD of targetted Android platform.


Select Plugins->A-B->Android->Create AVD and fill in details. One needs to enter AVD Name (Specify identifiable name by which you can guess platform later), Target (platform),  SD Card Size and Skin. If no dialog box comes up check your $PATH variable, that happened with me and I kept wondering until I realize that Android sdk tools directory was missing from path.

If you see this error "Error: This platform has more than one ABI. Please specify one using --abi." in console window (requires console plugin) manually specify ABI as bellow.
android create avd -n avd-jelly-bean -t 11 -c 32M -s WVGA800 --abi x86
Android 4.1 is a basic Android platform.
Do you wish to create a custom hardware profile [no]
Process android exited with code 0
Created AVD 'avd-jelly-bean' based on Android 4.1, Intel Atom (x86) processor,
with the following hardware config:
hw.lcd.density=240
vm.heapSize=48
hw.ramSize=512
 PS. Bye no means this is an Android tutorial, nor I am a pro. To know about ABI etc follow any Android programming tutorial.


Launch the AVD by selecting "Launch AVD"


Depending upon how powerful machine you've got, sooner or later you'll see AVD running.

Now create a android project

Create a project viewer project. This one is for jEdit to track and different from Android project.


Build and deploy this project, and you shall see it in you emulator listed among other apps like this


Update:
If you see an error like "waiting for device" even if the AVD  is running try instructions from here.

This ends the tutorial here, I would like to reiterate that I am not a pro and if you want to learn Android programming in detail here is a link.

Thanks for reading, many thanks goes to Dale Anson for this plugin. See you some time later :).

Sunday, September 30, 2012

Android development using jEdit part 1

While there are many good IDEs for android development like eclipse, NetBeans, intelliJ;  sometimes one may want to use lightweight editor to create android apps and still don't want to get into command line every time.

Here's a little how-to of creating android projects, AVDs using jEdit and it's Android plugin.

First off-course you need Android SDK installed and setup the path. Following is one example on openSUSE 12.2.


Download the Android SDK from this link.
Unzip into a convenient location, remember that you need to give the location name in PATH environment variable.
Install Android version you want to target.


Setup PATH in .profile, for example
export PATH=${PATH}:/home/ashish/android-sdk-linux/tools/
Install jEdit from here (I am using jEdit 5.0pre1)
Open plug-in manager and install Android plugin


Now you will start seeing options for creating AVDs, projects etc.


In upcoming parts I shall describe Android development further using jEdit, and its Android plugin.