Re-posting : An outrageously simple note taking android app made further better (part 5)
In this post we will cover sending SMS through Android App and also how to read contacts.
I apologize for the gap in coming up with this post. I can only work as much as my health permits, which sometimes not very long. :)
The very first thing an Android app needs is to register for permission to send SMS and read contacts. This can be done by putting these lines into AndroidManifest.xml.
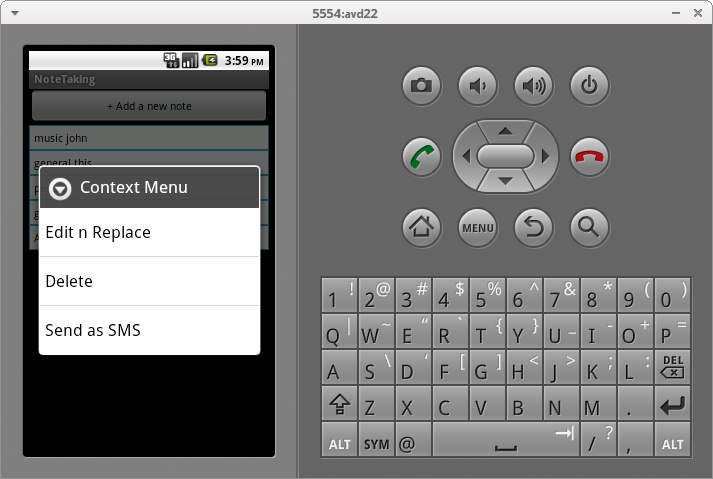
We will add a new menu item in context menu like below.
public void onCreateContextMenu(ContextMenu menu, View v,ContextMenu.ContextMenuInfo menuInfo) {
super.onCreateContextMenu(menu, v, menuInfo);
currentNote = ((TextView)v).getText().toString();
// Create your context menu here
menu.setHeaderTitle("Context Menu");
menu.add(0, v.getId(), 0, "Edit n Replace");
menu.add(0, v.getId(), 1, "Delete");
menu.add(0, v.getId(), 2, "Send as SMS");
}
And we will see somethinglike below.
For handling this menu item we will add a new else section.
public boolean onContextItemSelected(MenuItem item) {
// Call your function to preform for buttons pressed in a context menu
// can use item.getTitle() or similar to find out button pressed
// item.getItemID() will return the v.getID() that we passed before
super.onContextItemSelected(item);
if ( item.getTitle().toString().equals("Delete")){
NotesDatabase db =new NotesDatabase(this);
db.searchAndDelete(currentNote);
onResume();
}
else if ( item.getTitle().toString().equals("Edit n Replace")) {
Intent intent = new Intent(this, EditNoteActivity.class);
intent.putExtra("ACTION","oldnote");
intent.putExtra("ACTION2","replace");
intent.putExtra(EXTRA_MESSAGE,currentNote);
startActivity(intent);
}
else if (item.getTitle().toString().equals("Send as SMS")){
Intent intent = new Intent(this, SendAsSmsActivity.class);
intent.putExtra("SMS", currentNote);
startActivity(intent);
}
return true;
}
In the newly added code we are creating a new Activity SendAsSmsActivity and passing the note as SMS in intent.
Here is SendAsSmsActivity.xml which is defined as below.
android:layout_height="fill_parent"
android:orientation="vertical">
android:layout_width="match_parent"
android:layout_height="wrap_content"
android:ems="10"
android:inputType="number"
android:hint="Enter number here..."
android:gravity="top|left">
android:layout_width="match_parent"
android:layout_height="1dp"
android:layout_weight="1"
android:ems="10"
android:inputType="text"
android:hint="Enter note here..."
android:gravity="top|left" >
android:layout_height="wrap_content"
android:orientation="horizontal"
android:weightSum="2">
android:layout_weight="1"
android:layout_width="0dp"
android:layout_height="wrap_content"
android:onClick="onClickSend"
android:text="Send" />
android:id="@+id/button2"
android:layout_weight="1"
android:layout_width="0dp"
android:layout_height="wrap_content"
android:onClick="onClickCancel"
android:text="Cancel" />

Here we are using nested LinearLayout with nested wights assigned to buttons as well as second edit text, which though is not a good practise; but for our small app workes fine.
Below is SendAsSmsActivity.java
public class SendAsSmsActivity extends Activity {
String sms = new String();
public void onCreate(Bundle savedInstanceState) {
super.onCreate(savedInstanceState);
setContentView(R.layout.sendassmsactivity);
Intent intent = getIntent();
EditText text = (EditText) findViewById(R.id.editText2);
Bundle extras = intent.getExtras();
sms = extras.getString("SMS");
text.setText(sms);
EditText text1 = (EditText) findViewById(R.id.editText1);
registerForContextMenu (text1);
}
public void onClickSend ( View button){
String SENT = "SMS_SENT";
String DELIVERED = "SMS_DELIVERED";
PendingIntent sentPI = PendingIntent.getBroadcast(this,0,new Intent(SENT),0);
PendingIntent deliveredPI = PendingIntent.getBroadcast(this,0,new Intent(DELIVERED),0);
//---when the SMS has been sent---
registerReceiver(new BroadcastReceiver(){
@Override
public void onReceive(Context arg0, Intent arg1) {
switch (getResultCode())
{
case Activity.RESULT_OK:
Toast.makeText(getBaseContext(), "SMS sent",
Toast.LENGTH_SHORT).show();
break;
case SmsManager.RESULT_ERROR_GENERIC_FAILURE:
Toast.makeText(getBaseContext(), "Generic failure",
Toast.LENGTH_SHORT).show();
break;
case SmsManager.RESULT_ERROR_NO_SERVICE:
Toast.makeText(getBaseContext(), "No service",
Toast.LENGTH_SHORT).show();
break;
case SmsManager.RESULT_ERROR_NULL_PDU:
Toast.makeText(getBaseContext(), "Null PDU",
Toast.LENGTH_SHORT).show();
break;
case SmsManager.RESULT_ERROR_RADIO_OFF:
Toast.makeText(getBaseContext(), "Radio off",
Toast.LENGTH_SHORT).show();
break;
}
}
}, new IntentFilter(SENT));
//---when the SMS has been delivered---
registerReceiver(new BroadcastReceiver(){
@Override
public void onReceive(Context arg0, Intent arg1) {
switch (getResultCode())
{
case Activity.RESULT_OK:
Toast.makeText(getBaseContext(), "SMS delivered",
Toast.LENGTH_SHORT).show();
break;
case Activity.RESULT_CANCELED:
Toast.makeText(getBaseContext(), "SMS not delivered",
Toast.LENGTH_SHORT).show();
break;
}
}
}, new IntentFilter(DELIVERED));
SmsManager smsManager = SmsManager.getDefault();
EditText text1 = (EditText) findViewById(R.id.editText1);
Log.v("phoneNumber", text1.getText().toString());
Log.v("MEssage",sms);
smsManager.sendTextMessage(text1.getText().toString(), null, sms, sentPI, deliveredPI);
finish();
}
public void onClickCancel( View button){
finish();
}
public void onCreateContextMenu(ContextMenu menu, View v,ContextMenu.ContextMenuInfo menuInfo) {
super.onCreateContextMenu(menu, v, menuInfo);
//currentNote = ((TextView)v).getText().toString();
// Create your context menu here
// Clear current contents
menu.clearHeader();
menu.clear();
menu.setHeaderTitle("Context Menu");
menu.add(0, v.getId(), 0, "Contacts");
}
public boolean onContextItemSelected(MenuItem item) {
// Call your function to preform for buttons pressed in a context menu
// can use item.getTitle() or similar to find out button pressed
// item.getItemID() will return the v.getID() that we passed before
super.onContextItemSelected(item);
if ( item.getTitle().toString().equals("Contacts")){
Intent intent = new Intent(this,readAllActivity.class);
startActivityForResult( intent, 0);
}
return true;
}
}
Kindly go through my previous post if you are not familier with above code.
We are here in onCreate method; setting the view by setContentView, getting the intent by getIntent, getting the note by getExtras and getString and assigning to second edit text. We are also registering the first edit text for a context menu.
onClickSend is the method registered for "Send" button. Here is the actual code for sending SMS Here we are creating PendingIntent which are a kind of callback mechanism in which we specifies the action need to be performed at a certain event later in lifecycle of application.
registerReceiver defines the method which needs to be performed in the case of event (SMS sent). It has two parameters one is BroadcastReceiver which actually holds the methods needs to be performed. When the onReceive overridden method is called it raises a Toast ( small info window) based on the return value of getResultCode which tells whether the action was prformed well.
Second parameter is a IntentFilter object.
Here's the toast :)

After that SmsManager.getDefault returns a sms manager object, which actually send the sms and also registers the PendingIntents.
Overriding onCreateContextMenu definesthe context menu which we have registered for text1 in onCreate. "Contacts" is the only menu item here.

In onContextItemSelected when we find this selected we start a new activity readAllActivity.
Here is readAllActivity.java
public class readAllActivity extends Activity {
public void onCreate(Bundle savedInstanceState) {
super.onCreate(savedInstanceState);
setContentView(R.layout.main);
readContacts();
}
public void readContacts (){
LinearLayout lLayout = (LinearLayout)findViewById(R.id.layout1);
final LayoutInflater inflater = (LayoutInflater)getSystemService(Context.LAYOUT_INFLATER_SERVICE);
Cursor cursor = getContentResolver().query(ContactsContract.Contacts.CONTENT_URI,null, null, null, null);
while (cursor.moveToNext()) {
String contactId = cursor.getString(cursor.getColumnIndex(
ContactsContract.Contacts._ID));
Cursor phones = getContentResolver().query( ContactsContract.CommonDataKinds.Phone.CONTENT_URI, null, ContactsContract.CommonDataKinds.Phone.CONTACT_ID +" = "+ contactId, null, null);
while (phones.moveToNext()) {
String name = phones.getString(phones.getColumnIndex( ContactsContract.CommonDataKinds.Phone.DISPLAY_NAME));
TextView b2 = (TextView) inflater.inflate(R.layout.textviews,null);
b2.setTextColor(Color.BLACK) ;
b2.setText(name);
registerForContextMenu(b2);
lLayout.addView(b2);
String phoneNumber = phones.getString(phones.getColumnIndex( ContactsContract.CommonDataKinds.Phone.NUMBER));
TextView b = (TextView) inflater.inflate(R.layout.textviews,null);
b.setTextColor(Color.BLACK) ;
b.setText(phoneNumber);
registerForContextMenu(b);
lLayout.addView(b);
}
phones.close();
}
cursor.close();
}
}
getContentResolve returns all the contacts in a cursor "phones", which we scrolls through and populates edit texts.
Till now all is fine except how do we return the selected phone number.
We have used startActivityForResult instead of startActivity in onContextItemSelected of SendAsSmsActivity.java file.
In readAllActivity.java we will add this method to set returning data
public void onClickTextView1(View v) {
Intent resultData = new Intent();
String s =((TextView)v).getText().toString();
resultData.putExtra("number", s);
setResult(Activity.RESULT_OK, resultData);
finish();
}
Aaaaand we shall have our number in first EditText.
Thanks to Wei-Meng Lee for his "Beginning Android Application Development" for sms code and stackoverflow.com for rest of help.
Hi Ashish
ReplyDeleteCan you post the link to download the final app with the above code.
i am noob in programming, can you convert it into apk package and post so that i can try and alter it according to my needs
Hi,
ReplyDeleteI am also a noob, I have uploaded the complete folder as zipped file here apk is in bin.
http://www.mediafire.com/download.php?wupahyaq55dcp9o
Also how you are going to alter APK?
I would never want to miss out any opportunity to read out your contents.
ReplyDeleteandroid rooting software
Thanks.
DeleteHi Ashish, I loved your way of explanation, I have found a way2sms sms application for sending free sms. Though its somewhat different and cannot access contacts of Mobiles but I thought it will be useful for your visitors and us.
ReplyDeleteDownload url:
http://way2smsfan.in/mobile-application/android/
I will be glad if you can guide how we can add this feature of fetching contacts from mobile phone.
Hi Ashish, I love your programming tutorials. I'm new to Android programming although i am pretty experienced in JAVA coding. I tried to your code and setup a timer for it, I mean like a SMS scheduler app, but it gave me an error, is there some simple one line code to setup a timer
ReplyDeleteCongrats for making it possible for creating this blog. I may not always visit this blog to see more updates but i will consider every valuable information i read here. Please keep up the good work and good luck for the upcoming post.
ReplyDeleteWay2sms login
Fantastic looking site! I have a site as well but unfortunately I’m not very good with design
ReplyDeleteAwesome article Aashish!!
ReplyDeleteYou have made my very doubt clear after providing such a code. Thanks
You may also visit http://way2smslogin.in
Thanks for sharing it is really a nice article. Bulk SMS marketing is really the best way to promote business android sms sender
ReplyDeleteIt was very helpful to me. keep posting amazing stuffs. Thanks Android Bulk SMS sender App
ReplyDeleteThanks for sharing such great article hope keep sharing such kind of article Bulk sms Sender software
ReplyDeleteThank you so much for providing such a useful information !!
ReplyDeleteAndroid sms sender
Best information about software.Thanks for sharing such great information. hope you keep sharing such kind of information Android Bulk sms sender
ReplyDeleteGood content and nice blog. Thanks for sharing
ReplyDeletesuch great information. hope you keep sharing such
kind of information Android Bulk SMS Sender
Adana
ReplyDeleteErzurum
Sinop
istanbul
Düzce
45B
Mardin
ReplyDeleteistanbul
Çanakkale
Antep
Elazığ
EPE7AF
görüntülü show
ReplyDeleteücretlishow
01G
https://titandijital.com.tr/
ReplyDeleteağrı parça eşya taşıma
maraş parça eşya taşıma
muğla parça eşya taşıma
uşak parça eşya taşıma
EOLL
ankara parça eşya taşıma
ReplyDeletetakipçi satın al
antalya rent a car
antalya rent a car
ankara parça eşya taşıma
VZT
74DC0
ReplyDeleteParasız Görüntülü Sohbet
Star Atlas Coin Hangi Borsada
Kripto Para Çıkarma Siteleri
Paribu Borsası Güvenilir mi
Nonolive Takipçi Hilesi
Sohbet
MEME Coin Hangi Borsada
Binance Referans Kodu
Nexa Coin Hangi Borsada
27681
ReplyDeletearbitrum
raydium
ledger desktop
poocoin
arculus
trezor suite
satoshi
metamask
defilama